You can still register after that date, and we'd love to have you... But, we do need a final count of attendees by the end of September for catering purposes. Sorry, but we can't register you at the door!
It looks like one of the major networks has a 2:30 slot for an SEC game, but we don't know if that will be LSU-Florida. Will be following ESPN, etc to see who picks it up and will let you know something re: time as soon as we can.
Meanwhile, Big Bad Bob Campo has been hard at work:
This is the back and top glued together showing the carving process. The 'step-downs' are done with an electric router
and templates to give the graduation levels that will then be blended
together with a hand held belt sander. This has been started on the far
side of the pic. When done, final dimensioning will be done by hand
to get everything shaped and smoothed, ready for paint.These are sketches of artwork I found on the web. The plan is to place one of these in mother-of-pearl at the 12th fret on the fretboard.
After some more scribbling and doodling, I decided on the screaming eagle design. Here it is with the pearl pieces cut and set in place on the fret board. This shows the rosewood fretboard sitting inn the slot cutting jig i engineered, (since i'm too tight to buy a real one). The slots are place at precise positions
relative to each other so as to give proper tone on each note when the
fret is pressed and the note is played. The neat thing about this is
some trigonometry comes in to play, as a 'rule of 18' is used. The distance
from the nut (at the tuner end of the board--above the eagle) and the
bridge where the strings lay across at the opposite end of the guitar is
divided by eighteen. That is the location of the first fret. The
second fret is the distance from
the first fret to the bridge, divided by 18, and so forth and so on.
That is why the distance between the frets gets less as you go down the
fretboard. Ain't numbers funny things?
At this point the board is still flat and the sides parallel. The sides will be tapered and sanded to a 12" radius before installing.
And, here is the board with the frets in it. It has been tapered, "radiused" and sanded progressively down to 1500 grit sandpaper to make it smoothe. Next is trimming the edges of the frets, installing white binding on the side with black dot markers, then gluing the board to the neck. At this point, the neck is not yet attached to the body of the guitar..
The binding is glued on the fretboard, with black side marker dots for fret identification. The sides of the neck still have to be sanded and smoothed to match the edged of the fretboard.
And voila!
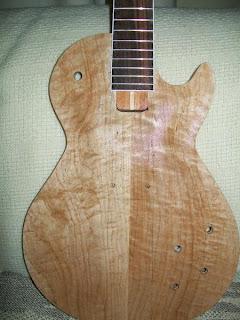
...the neck is dry fitted
in place with the top carve 98% finished. I put water on it so you
could get an idea of what the top will look like when cleared. I also
have to cut out cavities
for the pickups to fit in and cut a channel around the top edge of the
maple to put white binding to cover the seam where the maple joins the
cedar.


No comments:
Post a Comment